Trying Out Cypress with Circle CI

Circle CI has been around a while but I’ve never tried their service before. There hasn’t been much of a reason to do so; at work I mostly stuck with a local Jenkins instance because it got the job done. But I recently had the urge to try it out for a private project that I have. I wanted to see if it plays well with Cypress, a test tool I’ve been using for some time.

A search tells me that there’s already a Cypress-Docker-CircleCI example on Github, from Cypress themselves. Cool, I just need to copy their settings to my own project and make changes accordingly.

Here’s how the package.json file looks like:

You’ll see a cy:circle-junit command in there, which does the same thing as cy:run (which runs tests on a terminal) but also builds a JUnit report.

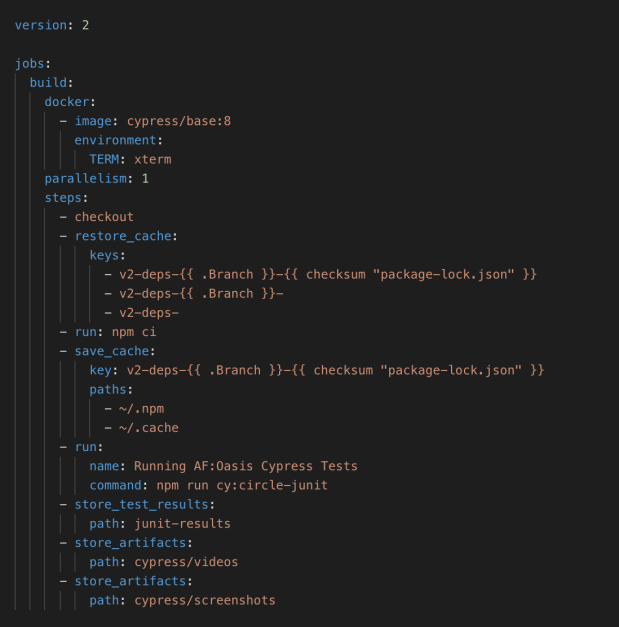
To run our tests on Circle CI, we’re going to need a circle.yml file inside our project, which contains the following:

From this file Circle CI is supposed to checkout the test code, run the cy:circle-junit command, which installs Cypress and other dependencies inside a Docker image, saves that image in a cache (and restores that cache for every succeeding test runs as long as the dependencies remain the same), runs our tests inside a container, creates a simple report, and stores test artifacts afterwards. Looks straightforward. 🙂

Now let’s see if things work!

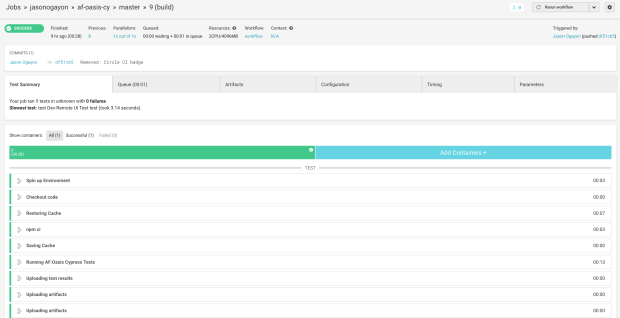
Connecting my Cypress project on Circle CI and pushing code changes on the remote repository automatically creates test runs that shows up on a neat dashboard like so:

And we can zoom in on the details of every test run, which looks like this:

Awesome! Looks like I’ll continue using their service for this project, and maybe on other projects as well. I’m off to adding proper tests to the suite!

 

Set Jenkins to Retry Tests after a Failure

As much as I want to keep user interface tests free of failures, timing issues and page element errors pop up from time to time in automated UI checks. If not a test bug, these often reflect the nature of the app under test, its behavior under certain conditions like the internet connection or the machine slowing down suddenly or the page not loading properly. Such errors can be annoying in tests and if we ever want to continue using them, we’ll have to re-run them some of the time to make sure that errors do exist.

To do this in Jenkins, use the Naginator plugin:

  • Download the Naginator Plugin
  • Install the downloaded plugin to Jenkins (Manage Jenkins -> Manage Plugins -> Advanced -> Upload plugin)
  • Select a desired Jenkins job and then click Configure
  • Scroll down to the Post-build Actions section
  • Add a Retry build after failure post-build action
jenkins_naginator_1

Add test retries as post-build actions

  • Set desired values for the following settings of the retry and then save changes:
    • Rerun build for unstable builds as well as failures (retry can work for unstable builds too)
    • Delay before retrying build (you can set a time delay before running the retry, value in seconds)
    • Maximum number of successive failed builds (means the test will run a certain maximum number of times until it succeeds again after the test fails the first time)
jenkins_naginator_2

Set retry settings: how many times to retry, delay for the next retry, etc

Post-Installation Notes after Setting-Up Cucumber-Ruby-Watir Automated Checks with Jenkins on a Windows 10 Amazon EC2 Server

Had a chance to set up cucumber tests to run via Jenkins on a Windows 10 Amazon EC2 server last week. It’s been a while since I installed everything from scratch, so that was good practice. I ran into some problems, which was a bit expected since my local setup was on Windows 7, so this post serves as a guide for possible future installations.

The process:

  • Install desired browsers where the tests will run.
  • Install Java and the latest JDK. Include the JDK path to Window’s system environment variables. This is necessary for running the selenium server.
  • Install the latest Ruby and DevKit versions, required for installing ruby gems and running the test suite.
  • Install Jenkins, which will take care of scheduling and test results reporting. Also install Jenkins as a service, to run automatically after the server boots up.
  • Install Git on the machine, and setup the credentials for retrieving the test code from the remote repository.
  • Check out the test code from the remote repository.
  • Set the selenium server to run automatically after the machine boots.
  • Install the required ruby gems using bundler.
  • Check if cucumber tests run properly by running a sample via the command line interface.
  • Create/Import Jenkins jobs for the cucumber tests. Install the Jenkins plugins necessary for test results reporting. Possibly set up Jenkins to pull the latest test code from the remote repository.
  • Run cucumber tests via Jenkins.

Some reminders for future installs:

  • Install the 32-bit version of Ruby’s DevKit instead of the 64-bit because the latter version creates problems with gem installs.
  • Windows 10 has trouble installing ruby gems (using the bundle install command) from the default HTTPS source. To fix this, replace the gems source list in the Gemfile from HTTPS to HTTP.
  • Install Jenkins using the MSI-based Windows installer on its own directory on the C drive, then install it as a service afterwards.
  • Do not install all suggested Jenkins plugins at first, especially the ones related to Git. These will break Jenkins on Windows so install only those that are actually needed for cucumber tests to run.
  • Via Jenkin’s Configure System module, set the shell executable to the location of the command line’s executable file (i.e., C:\Windows\system32\cmd.exe) so that Jenkins can run cucumber tests via the default Windows command line interface. In addition, each Jenkins job Build needs to be set as “Execute Windows Batch Command” instead of “Execute Shell”.
  • Remember to change the timezone of the machine to the proper timezone.
  • Test a sample basic cucumber project first to see if cucumber is properly running on the machine before retrieving the actual test suite from the Git repository.
  • In saving the machine’s generated public SSH identification (via Putty or the ssh keygen command using Cygwin), do not include a name for the file to be saved so that the system generates the default id_rsa.pub file.

Jenkins User Interface Tweaks

Last week, I have found myself tinkering with Jenkins again because of several reasons. I wanted to schedule the CucumberWatir functional checks I’ve written in the past two months so I don’t have to run them every time in the terminal. I also wanted to have a record of the results of the latest checks so I can look back at them when I need to. More importantly, I wanted a place where anyone from the team can view the said checks and see if our Staging environment is stable or not according to the smoke tests.

Of course, I also wanted this place to be somewhat nice-looking, which the default Jenkins page somewhat lacks.

And this is what I ended up with. :)

And this is what I ended up with. 🙂

And here are the tweaks I did to make the Jenkins user interface a little better:

Upload a Jenkins Plugin

Upload a Jenkins Plugin

Set the Jenkins CSS theme to Material

Set the Jenkins CSS theme to Material

Update jenkins.xml to allow CSS content

Update jenkins.xml to allow CSS content

  • Allow HTML content in views and jobs descriptions. To do this:
    • Go to Manage Jenkins -> Configure Global Security
    • In the Markup Formatter field, select Raw HTML or Safe HTML
    • Click Save
Set View and Job descriptions to display HTML content

Set View and Job descriptions to display HTML content

  • Use the Ansicolor Plugin to properly display colors in the job’s console output. To do this:
    • Download the Ansicolor Plugin
    • Install the downloaded plugin to Jenkins (Manage Jenkins -> Manage Plugins -> Advanced -> Upload plugin)
    • Configure the desired job’s Build Environment to use the Color ANSI Console Output
Set a desired Jenkins job to use colored outputs in the console

Set a desired Jenkins job to use colored outputs in the console

Sample Jenkins colored console output

Sample Jenkins colored console output