Cypress: Printing Information to the CLI

Most people will run tests written in Cypress via the built-in test runner. It provides much of the information people need when looking at tests and checking whether it is doing what it is supposed to do – test status, command logs, app preview for each test run, plus snapshots of test steps. Very useful when looking at test failure points.

Some people, however, like to run Cypress tests using the terminal or the command-line interface. Sometimes, we don’t necessarily have to see the test running over the app UI. For one, I can start writing a draft of a new set of tests while the existing test suite runs in the background; I will want to know if there are failing tests, but not get distracted by them running on the test runner. That’s how tests run on a CI server too; we just want the test results.

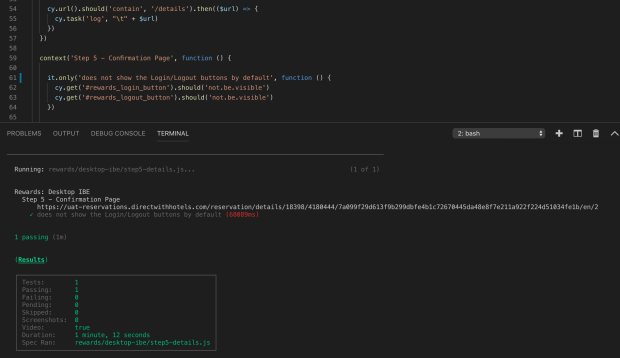
Cypress works well for both scenarios. There’s just less information displayed on the CLI from running tests by default. To help us debug failing tests without opening the test runner, we could print out information we need from the test as it runs. If we want, we can show network request and response pairs, or simple variable values. Often, I find that printing out the URL at certain point for some tests helps me understand test results better. I can also click that URL to redirect me to the page afterwards if there are details I want to check out later for myself.

In order to print that URL to the terminal, we’ll need to add a task to Cypress as a plugin. To do that, we open the plugins/index.js file and add a log task there, like so:

After that, we can now use the log task inside our tests. Here’s an example:

Help Yourself Perform Tasks With Personal Shortcut Commands

In a recent automation work I’ve been asked to take part in, running a single test safely, according to peers, generally follow a three-step process:

  1. Delete existing feature files:  rm -rf *.feature
  2. Create updated feature files:  PROJECT_DIRECTORY=../<dir> APP=<app> TEST=automated ruby create_tests.rb, where app is the name of the app you want to test
  3. Run the desired specific test:  cucumber --tags @<tag>

This means I have to re-run these three steps over and over for every single test I want to review. That can get tiring easily, especially if I have to re-type them repeatedly, or even if I copy-paste. Using the arrow keys in the terminal helps, but sometimes commands can get lost in the history and then it becomes a bit of a hassle to find them.

There should be a way for me to run an automated check I want to review, given just the app name and the test tag. It would be nice if I can run a specific test using a shorter command but still following the same process as provided.

I decided to set aside a little bit of time to write a personal script, and used Makefile because I’ve had experience with that before.

My personal short command for running a test:  make test app=<app> tag=<tag>

And here’s what the script looks like, which runs the known commands step-by-step plus displays some information on what’s currently happening:

Now I won’t have to worry about remembering what commands to type in as well as the sequence of the commands. I can give more focus on actually reviewing the test itself, which is what’s more important.

Trying Out Cypress with Circle CI

Circle CI has been around a while but I’ve never tried their service before. There hasn’t been much of a reason to do so; at work I mostly stuck with a local Jenkins instance because it got the job done. But I recently had the urge to try it out for a private project that I have. I wanted to see if it plays well with Cypress, a test tool I’ve been using for some time.

A search tells me that there’s already a Cypress-Docker-CircleCI example on Github, from Cypress themselves. Cool, I just need to copy their settings to my own project and make changes accordingly.

Here’s how the package.json file looks like:

You’ll see a cy:circle-junit command in there, which does the same thing as cy:run (which runs tests on a terminal) but also builds a JUnit report.

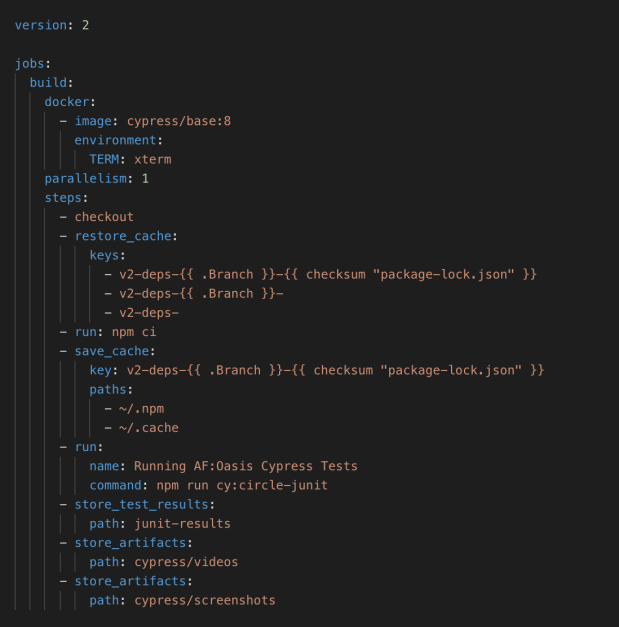
To run our tests on Circle CI, we’re going to need a circle.yml file inside our project, which contains the following:

From this file Circle CI is supposed to checkout the test code, run the cy:circle-junit command, which installs Cypress and other dependencies inside a Docker image, saves that image in a cache (and restores that cache for every succeeding test runs as long as the dependencies remain the same), runs our tests inside a container, creates a simple report, and stores test artifacts afterwards. Looks straightforward. 🙂

Now let’s see if things work!

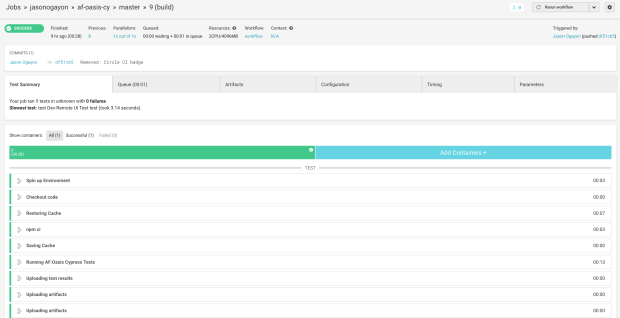
Connecting my Cypress project on Circle CI and pushing code changes on the remote repository automatically creates test runs that shows up on a neat dashboard like so:

And we can zoom in on the details of every test run, which looks like this:

Awesome! Looks like I’ll continue using their service for this project, and maybe on other projects as well. I’m off to adding proper tests to the suite!


Automating the Windows 10 Desktop Calculator using PyAutoGui

Last year, I’ve tried automating a Windows 7 desktop calculator using a Java library called Winium. A year later, someone from the comments told me that the example didn’t work on Windows 10. I ignored the comment for a while because I didn’t have a Windows 10 machine to perform a test back then, but now that I’ve recently upgraded my home PC I decided to try it out.

What I found:

Running a Windows 7 desktop calculator automation example (using Winium) on a Windows 10 machine

The Windows 10 calculator opened up but the tests didn’t run properly. The error log told me that the program was unable to find the calculator elements it was supposed to click. Bummer. Maybe the names of the calculator elements were different, Windows 10 versus Windows 7? It wasn’t; the element names were still the same according to UI Spy. Perhaps there’s something from Winium that can point me to a clue? Oh, it seems that the library has not been updated in recent years.

If I can’t use Winium, how then can I automate the Windows 10 calculator? A Google search pointed me to PyAutoGui. Instead of Java, it says that I’ll need Python (and Pip) for this tool to work. And yes, being Windows, I also need to properly set the environment variables so I can use the Python and Pip commands on a terminal.

Let’s install PyAutoGui:

Installing PyAutoGui

And after writing some code, let’s see if we can automate the Windows 10 calculator with it:

Automating the Windows 10 desktop calculator with PyAutoGui. Click the image to view the GIF full-size on another browser tab 🙂

It works!

But here are some catches:

  • I had to rely on PyAutoGui’s keyboard control functions for performing the calculator actions, instead of finding elements via the user interface. Well, from what I’ve seen so far from the docs is that the only way to locate a UI element is by locating elements using screenshots. I tried that the first time and it was very flaky, so I opted for using the keyboard control functions instead.
  • The code introduces a time variable to wait for the calculator to appear on screen. The code also introduces a time variable to pause a portion of a second in-between each keyboard action so the actions don’t happen too fast for a person’s eye.
  • There are no assertions in the example code, because I couldn’t find any assertion functions I could use from the PyAutoGui docs. It is not a tool built for testing, only for automating desktop apps.

Source code for this experiment can be found on: Win-Calculator-PyAutoGui.

Set Cucumber to Retry Tests after a Failure

This is probably old news, but I only recently found out that there is a way for Cucumber tests running in Ruby to automatically retry when they fail.

Here’s a sample failing test:

Apparently we can just add a --retry command to set the test to retry if it fails. And we can set how many times we want the test to retry. If we retry the failing test above to retry two times, with a --retry 2 command, we’ll get the following output:

It did retry the test twice, after the initial failure. Neat! 🙂

But what happens if we run the test, with the same retry command, and the test passes? Does the test run three times? Let’s see:

Good, the retry command gets ignored when the test passes.

Cypress and Mochawesome

A week ago I was working on a quick automation project which asks for an HTML report of the test results to go along with the scripts. It was a straightforward request, but it was something that I don’t usually generate. Personally I find test results being displayed in a terminal to be enough, but for the said task I needed a report generator. I had already decided to use Cypress for the job so I needed something that plays well with it. In their docs I found a custom reporter called Mochawesome.

To install it, I updated the package.json file inside the project directory to include the reporter:

The Cypress documentation on Reporters also said that for Mochawesome to properly work I should also install mocha as a dev dependency, so that’s what I did.

And then run npm install on the terminal to actually install the reporter.

Before running tests, there’s a tiny change we need to write on the cypress.json file inside the project directory, which tells Cypress which reporter do we want to use for generating test reports.

And we’re all set after all that. 🙂

Run Cypress tests by running cypress run --reporter mochawesomeOr if you specified a script in the package.json file the same way I did in the first photo above, just run npm test.

After running tests, we’re going to find out that a mochawesome-report directory has been added to our project directory which houses both HTML and JSON reports of the tests.

A sample HTML test report looks something like this:

Looks nice and simple and ready for archiving.

Welcome Back, Selenium IDE!

I was browsing my Feedly news feed recently, as I routinely do once a week, and saw this particular bit of cheery bulletin:

Click to redirect to the official announcement from Selenium HQ

Long live Selenium IDE! 🙂

Nostalgia hits. I remember the days when the only automation I knew was Selenium IDE’s record-and-playback. It’s easy to install, is relatively fast, and isn’t difficult to pick up as the Selenese commands are straightforward. It was possible to run a test individually as well as to run tests as a suite. There was a way to manually change test steps, and, of course, save tests, as needed. It only worked on Firefox at the time, but that for me back then was good enough. At least until I eventually craved for the re-usability, maintenance, and customization advantages that programming has over record-and-playback.

This is what it looks like now:

And some delightful things about it (that I don’t remember – or perhaps forgot – having seen in the Legacy IDE):

  • Command dropdown options in English
  • Control flow commands baked in
  • An execute async script command
  • A run command to run tests headlessly! 😮
  • Google Chrome extension and Firefox add-on versions out of the box

Although I don’t see myself going back to record-and-playback tools for my automation needs, I’m still glad Selenium IDE is back for everyone to try. It’s still a great tool for recording quick automated browser scripts, for demo purposes or otherwise, as well as for learning automation in general.

Docker: A Dockerfile to Fix the “Call to undefined function pg_connect()” Error when Using PHP with Postgres

When integrating a PHP application connecting to a PostgreSQL database, both services running as Docker containers using the official PHP and Postgre images, you might encounter (as I have) an error that looks something like this:

    Uncaught Error: Call to undefined function pg_connect() in ...

It’s actually a simple error, which means that there’s something wrong with the connection between the app and the PostgreSQL database, but when I first stumbled on it I had a hard time finding out what I needed to do to fix it. There was definitely something missing from the Docker setup, but I did not know what it was until I sought help from a teammate.

Apparently the official PHP docker image does not contain the PDO and PGSQL drivers necessary for the successful connection. Silly me for assuming it does.

The fix is simple. We have to create a Dockerfile that updates our PHP image with the required drivers, which contains the following code:

FROM php:7.1-fpm

RUN apt-get update

# Install PDO and PGSQL Drivers
RUN apt-get install -y libpq-dev \
  && docker-php-ext-configure pgsql -with-pgsql=/usr/local/pgsql \
  && docker-php-ext-install pdo pdo_pgsql pgsql

Easy peasy. And to run this Dockerfile from a docker-compose.yml file, we’ll need the build, context, and dockerfile commands, replacing the single image command that does not use a Dockerfile:

version: '3'
services:
  php:
    build:
      context: ./directory/of/Dockerfile
      dockerfile: ./Dockerfile
    # All your other settings follow ...

And that should be all that you need to do! 🙂

Cypress: Stubbing Network Requests with Cy.Route()

I very much enjoy testing web apps by simulating their network requests via code. This allows me to visit websites, login, and replicate functionality, all without a browser, a slightly different sort of testing than many testers are accustomed to. I love to explore what’s happening under the hood when we click elements and submit forms, I like to play with cookies and payloads, I try to find out what bare minimum of data do I need to pass through HTTP requests to recreate a particular user behavior. People often do this kind of testing with Postman but I’ve been accustomed to implementing tests with Ruby and the rest-client gem. Recently though I looked at how Cypress plays with network requests, especially curious about how they take it further with their built-in request stubbing feature using cy.route() because I have never tried stubbing before.

First, some context on HTTP requests:

  • GET requests often simulate visiting (or redirecting to) a web page or retrieving a resource (like an image or another file)
  • POST requests often simulate a form submission, like logins or payments, and as such deals with passing inputted data in order to proceed to the next application state
  • There are other types of HTTP requests but mastering how these two work is enough at the start

And here is an example of how Cypress helps you perform a said GET request:

and for a POST request:

Pretty straightforward and easy to follow. Notice that POST requests have more information in them than GET requests, since we’re passing data – the body field is concerned with user inputs while the headers field is concerned with the user session, among other things. Of course, both requests need a url field, some place to send the request to.

And when we send a request, we receive a response. That response tells us about how a web application behaved after the request – was the user redirected to another page? was the user able to log in? did an expected web element got displayed or hidden? were we sent to an error page, perhaps?

Cypress takes network requests further by introducing routing to testing. Here’s an example:

What the above code says is that we want to use Cypress as a server and we want to wait and listen for a POST request that’s going to the /login URL after a submit button (with an id of #submitButton) is clicked, after which we want to respond with a { success: false } result. This means that the actual response from our application from that url is going to be taken over by a fake response that we designed ourselves. This is what stubbing a network request looks like.

Now why would we want to do this? Some reasons:

  • We want to check how an application behaves for scenarios where a request fails to reach the application server. Do we redirect the user? Or do we show an error popup? Or does the application also work offline? To do this without stubbing, we would need some help from a programmer to shut down the app server at the right time after we perform the scenario.
  • We want to speed up tests by stubbing the response of some requests with less data than the actual responses deliver. We can even have the response data to be empty, if we don’t necessarily need that specific data for a test.
  • We want to see what happens to the application when it receives an incorrect response value from a request.

This is one thing I am loving about Cypress. Out of the box, they allow me to play with network requests alongside testing the user interface, and lets me tinker with it some more.

Dockerizing Our Legacy Apps: Some Notes

I spent the recent weeks of January tinkering with Docker in both Windows 7 and Mac OS. I played with it a lot because I thought it’s something that’s useful for a grand new project we have at work, and I thought that integrating our legacy application code to it would help me learn about it more. And the exercise did help me understand the tool better, including some nuances with application performance and database connections. I was able to dockerize our legacy apps too! 🙂

Some notes to remember related to the exercise:

  • Windows 7 Docker Toolbox and Docker for Mac has a performance issue with volume mounts through docker-compose. Legacy apps composed of a large number of files (especially with dependency directories) will run, but they will be painfully slow out-of-the-box. Fortunately for Docker for Mac users, docker-sync has an effective workaround for this problem. It involves running an in-sync container for the application code, separate from the docker-compose file. Unfortunately, I have not found any workarounds for said performance issue for Windows 7 (and perhaps Windows 8) Docker Toolbox users.
  • Often we have to update the host file of our server machine so that we can run applications locally using a distinct, easy-to-remember URL through a browser. This means we need to add extra hosts to necessary docker containers too if we dockerize our apps. We can do this by using the extra_hosts command in docker-compose.
  • The official Postgresql docker container does not include the pdo, pdo_pgsql, and pgsql drivers, which handles the connection between the application and the database. To install those drivers inside the official container, we’ll need to use a Dockerfile and build it from the docker-compose file with the build and context commands.
  • Sometimes we have a need to copy the Postgresql DB files from a running container to set up a proper volume mount of database data from host to container. We can copy that data by using the convenient docker cp <source> <destination> command. I had this work in Docker for Mac. However, for Windows 7 Docker Toolbox users, a docker container is unable to use such copied data, perhaps because of the difference in OS between host and container, so I had to resort to restoring and backing up data every time I start and stop my application containers.
  • As a tester, what Docker provides me is a convenient tool to test all sorts of interesting application configurations as much as I want to on a single machine, see if the apps break if I changed some service config, and find out which configurations work or not. I can add or remove a new service, or even update an existing service to a new version, like updating PHP from 5.6 to 7.1, and immediately see what impact it has on the apps themselves. These kinds of tests are often left to operations engineers, but I’m glad there is a now a way to do such tests on my own machine, before application changes even reach a dedicated testing server.
  • Even if Docker makes it easy to setup an application development environment from scratch with docker-compose and Dockerfiles, it is still important to maintain a wiki of the necessary machine configurations a programmer needs to perform in order to reset or build the apps with only a single command, or two. Subtle things like custom docker-compose files, .env and php.ini files, host files, Nginx configs, or turning long docker commands into shortcuts with shell scripts or make commands.
  • Makefile tasks can help put specific scripts into an easy-to-remember command with context. I assume Rakefile does the same thing in Ruby, or Jakefile in JavaScript.
  • Dockerizing our legacy apps pushed me on a discussion with programmers about the ways they run said applications on their machines. Most of them actually just test code changes directly on Staging or another available development server. That speaks about one habit we have as a development team, and likely the reason why our apps are a pain to setup locally.