Set Cucumber to Retry Tests after a Failure

This is probably old news, but I only recently found out that there is a way for Cucumber tests running in Ruby to automatically retry when they fail.

Here’s a sample failing test:

Apparently we can just add a --retry command to set the test to retry if it fails. And we can set how many times we want the test to retry. If we retry the failing test above to retry two times, with a --retry 2 command, we’ll get the following output:

It did retry the test twice, after the initial failure. Neat! 🙂

But what happens if we run the test, with the same retry command, and the test passes? Does the test run three times? Let’s see:

Good, the retry command gets ignored when the test passes.

Uploading Images in Watir 6.0.2

Even when most of the automated checks in our test server are running via the HTTP layer instead of using the browser, I have kept the automated UI versions of those tests for review purposes. They’re not very practical for continuous integration but still fun to watch sometimes, at least for me. It is also good practice to fix them when they break, to see whether I’m still updated with how Selenium or Watir runs.

And recently I found out that I’m unable to upload images in Watir 6.0.2 using the usual way, giving me an error:

element located, but timed out after 30 seconds, waiting for true condition on <element location> (Watir::Exception::UnknownObjectException)

The test code in question was this, written using the page-object gem

self.photo = IMAGE_FILEPATH

where photo is just a given name for a file field in the page where an image is to be uploaded. In basic Watir, this can also be written as

@browser.file_field(:id, "LOCATOR_PATH").set(IMAGE_FILEPATH)

Both test code are timing out, and the test failing because of the exception error. When manually checked, there are no issues in uploading images whatsoever.

Apparently, this an open issue in Watir and the workaround at the moment is to properly set the values of Watir’s relaxed_locate before and after the actual image upload code, like so

Watir.relaxed_locate = false
self.photo = IMAGE_FILEPATH
Watir.relaxed_locate = true

or

Watir.relaxed_locate = false
@browser.file_field(:id, "LOCATOR_PATH").set(IMAGE_FILEPATH)
Watir.relaxed_locate = true

And that makes the image upload work again. Both work for Google Chrome and Mozilla Firefox. 🙂

An Encounter with the ‘cucumber.yml was found, but could not be parsed’ Error

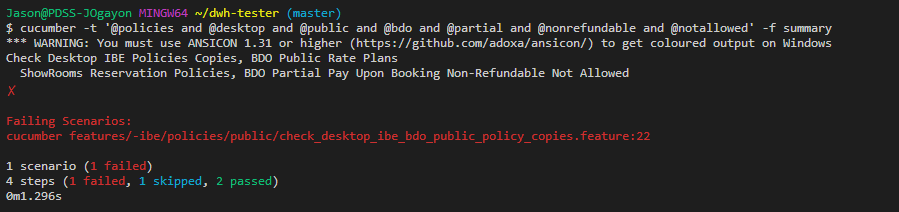
One day last week I merged a colleague’s new feature tests to the existing test repository. Routinely after that, I logged in to our dedicated test server, updated the existing running test suite by retrieving the latest merged code, and ran a ‘bundle update’ because the updated code required the latest versions of the dependencies. The updates finished without hitches as expected after a minute or so. Task’s done, I just need to run a sample test to be certain everything’s well and good.

An error blows up in my face:

cucumber.yml was found, but cannot be parsed. Please refer to cucumber’s documentation on correct profile usage.

Before all these, I had run a simulation of the gem updates on my local machine including running all tests to make sure there were no surprises when updating the test server. But I was still caught off-guard. I didn’t see that coming.

What? That’s always the first question. I squinted at the screen and looked at the error message again; it says something about the cucumber.yml file unable to be read by the machine, like it was corrupted. I opened the file to check (which contains various cucumber profile configuration set up for running tests on different test environments), was able to view its contents in the text editor, inspected it for unfamiliar code and found nothing. It looks okay, but the machine says otherwise. Why?

I tried an initial Google search for the error message and saw a fix that was written five years ago, saying that the error occurs because of a particular ‘rerun.txt’ file. The post tells me that the problem will go away if I delete that file.

Except that I don’t have that file in my code repository. What now?

Maybe there’s really something going on with the test code. Let’s see what happens if I delete a particular profile in the cucumber.yml file. Done. No changes in behavior, error still exist. What if I delete everything? Done. Error didn’t go away. Hmm.. that’s odd. It seems that the file contents are not the problem, is valid YAML code too according to online checkers, and the file is not damaged in any way I can see.

I went to back to looking at the search results for possible solutions People keep telling me its about the rerun.txt file. Others say I need to edit a cucumber library file in order to see what test code specifically causes the error for cucumber’s runner. No more other clues. Now this is difficult.

I kept researching for plausible fixes online for a few hours, I thought that there may still be something that can help me but I missed. No such luck. Okay, let’s try editing that library file and see what happens. It was a first time viewing library code, because I didn’t have any reason to do it before, and told myself that maybe I should actually check it out more often.

I found the command-line interface profile_loader file and the particular code which loads the cucumber.yml  file in question:

Found you, cucumber's profile loader!

Found you, cucumber’s profile loader!

Commented out some few lines of code as suggested:

Now let's see what your problem really is

Now let’s see what your problem really is

Then ran the sample cucumber test again:

A problem with the Psych module! What's that? :O

A problem with the Psych module! What’s that? :O

Okay. It says that a missing private method named ‘load’ is being called for a particular Psych module. No wonder cucumber is failing. Bummer, I don’t have a single idea about a Psych module that cucumber runs. All I can do is another Google search for the new error message and maybe find a workaround.

I am reminded that problems in building systems for automated test suites are not limited to writing test code and the application under test. Just like any other software, they can sometimes break in areas we do not know anything.

Eventually I found this enlightening post on a Github repository:

Interestingly, a very short solution. It was a rubygems bug after all, and what I needed to do was to run a ‘gem update –system’ command to get our cucumber tests back up and running.


Post-Installation Notes after Setting-Up Cucumber-Ruby-Watir Automated Checks with Jenkins on a Windows 10 Amazon EC2 Server

Had a chance to set up cucumber tests to run via Jenkins on a Windows 10 Amazon EC2 server last week. It’s been a while since I installed everything from scratch, so that was good practice. I ran into some problems, which was a bit expected since my local setup was on Windows 7, so this post serves as a guide for possible future installations.

The process:

  • Install desired browsers where the tests will run.
  • Install Java and the latest JDK. Include the JDK path to Window’s system environment variables. This is necessary for running the selenium server.
  • Install the latest Ruby and DevKit versions, required for installing ruby gems and running the test suite.
  • Install Jenkins, which will take care of scheduling and test results reporting. Also install Jenkins as a service, to run automatically after the server boots up.
  • Install Git on the machine, and setup the credentials for retrieving the test code from the remote repository.
  • Check out the test code from the remote repository.
  • Set the selenium server to run automatically after the machine boots.
  • Install the required ruby gems using bundler.
  • Check if cucumber tests run properly by running a sample via the command line interface.
  • Create/Import Jenkins jobs for the cucumber tests. Install the Jenkins plugins necessary for test results reporting. Possibly set up Jenkins to pull the latest test code from the remote repository.
  • Run cucumber tests via Jenkins.

Some reminders for future installs:

  • Install the 32-bit version of Ruby’s DevKit instead of the 64-bit because the latter version creates problems with gem installs.
  • Windows 10 has trouble installing ruby gems (using the bundle install command) from the default HTTPS source. To fix this, replace the gems source list in the Gemfile from HTTPS to HTTP.
  • Install Jenkins using the MSI-based Windows installer on its own directory on the C drive, then install it as a service afterwards.
  • Do not install all suggested Jenkins plugins at first, especially the ones related to Git. These will break Jenkins on Windows so install only those that are actually needed for cucumber tests to run.
  • Via Jenkin’s Configure System module, set the shell executable to the location of the command line’s executable file (i.e., C:\Windows\system32\cmd.exe) so that Jenkins can run cucumber tests via the default Windows command line interface. In addition, each Jenkins job Build needs to be set as “Execute Windows Batch Command” instead of “Execute Shell”.
  • Remember to change the timezone of the machine to the proper timezone.
  • Test a sample basic cucumber project first to see if cucumber is properly running on the machine before retrieving the actual test suite from the Git repository.
  • In saving the machine’s generated public SSH identification (via Putty or the ssh keygen command using Cygwin), do not include a name for the file to be saved so that the system generates the default id_rsa.pub file.

We Refactor When We Learn Better Ways Of Doing

For the past month or so, inspired by the lessons I learned from Jeff Nyman’s test description language blog post seriesGerard Meszaros’ talk about test abstractions, and Codecademy’s online class about the Ruby programming language, I have been steadily performing good chunks of code refactoring of our existing cucumber-watir-ruby end-to-end functional checks, which included (but not limited to) the following:

  • Cucumber
    • Removing information from cucumber steps that do not directly affect what is being checked in tests
    • Explicitly describing what the cucumber check is for, instead of using vague Then statements
    • Using step commands for re-using repeated cucumber steps
    • Renaming variable, method, and class names used for assertions so they mean what they actually mean
  • Ruby
    • Applying double pipes to set default variable values when necessary
    • Using one-line ifs and unlesses whenever possible, for readability purposes
    • Converting simple multi-line if-else statements to one line whenever helpful using the ternary/conditional operator
    • Replacing + or << operators with string interpolation
    • Using symbols for hash keys instead of string names because they’re faster to process
  • Locators
    • Making xpath locators shorter/readable whenever possible using the // modifier

It’s all difficult work, possibly more strenuous work than writing new checks even though basically I’m just rewriting existing tests into a more readable and maintainable form. I’m breaking existing code because they’re not so easy to understand and then revising them in order for their intent to be more understandable in plain view, finally making sure they’re checking whatever they’re supposed to, so that they act as a better source of truth for knowing how our applications behave and deliver value.

Learning How To Write Better Cucumber Scenarios

Some of the important lessons in writing automated checks are found, not in the actual implementation of the check itself, but rather in the specification. What does a green check mean? What are we really trying to find out when we’re running this check? Will somebody from another team understand why this test was written? Does this check say what’s necessary in a feature or does the check only state a procedure without context? Too often we concentrate on syntax, frameworks, and required steps in building automation, but not so much on clearly expressing what’s being checked and why the check is recorded in the first place. I’ve made that mistake and now I am trying to learn how to write better checks.

Take, for example, the cucumber checks below. Would you say that it is clear what’s being verified in the test? What would a product owner probably say about these checks when they see them for the first time?

Scenario Outline: Validating the Rate Plan Policies
  Given I am in the ShowRoomsPage for a "<hotel_type>" property from "<arrival>" to "<departure>" for a "<rateplan>" rate plan for a "confirmed" reservation
  When I view the policies for the rate plan
  Then I know that these are the correct policies
  
  Examples:
  | hotel_type | arrival         | departure       | rateplan            |
  | DWH        | 4 DAYS FROM NOW | 6 DAYS FROM NOW | Public_Partial_LT   |
  | DWH        | TOMORROW        | 3 DAYS FROM NOW | Public_Full_YesR_LT |

Some of the questions that would probably pop up in their minds include the following: How are the examples in the grid necessary for the test? What does Public_Partial_LT or Public_Full_YesR_LT mean? Do we really need to know the arrival and departure date settings for the checks? What does the Given statement mean? Most importantly, how do I know that the policies are actually correct for these tests?

This was how I wrote my checks before when I started studying how to write Cucumber-Watir-Ruby checks. And a lot of my checks in the existing test suite still are. I am, however, trying to learn how to re-write them in a better way, in terms of readability and conciseness, guided by lessons so far learned from Jeff Nyman’s test description language blog posts, so that almost everybody in our team can recognize in a glance what a particular check does and why they are included in the feature.

Re-writing the example checks above, I now have these:

Scenario: ShowRooms Prepayment Policy, DWH Partial
  When guest views the policies for a DWH property for a partial rate plan
  Then a copy of "Only 10% prepayment is required to confirm your reservation" is displayed in the prepayment policy

Scenario: ShowRooms Prepayment Policy, DWH Full Non-Refundable
  When guest views the policies for a DWH property for a full nonrefundable rate plan
  Then a copy of "Full prepayment is required to confirm your reservation" is displayed in the prepayment policy

Not perfect, but I’d like to think that they are more effective than the ones I had before. Checks are more specific, unrelated information are not included in the test, and we understand what it means when the checks pass or fail.

What do you think?

Defining What Cucumber-Watir-Ruby Checks To Run by Passing Parameters

Like any other type of document, automated checks can build up to so many files. There can be many features we would like to run tests on and it can be hard to keep track of all them every time. Maybe we prefer writing varying groups of checks in one single file, which cucumber does not restrict us from doing. We may also like to run our checks on different test environments, browsers, or locations that does not necessarily require a change in a feature to test but rather only an adjustment in configuration. Fortunately, there are ways to perform all of this without remembering numerous commands to run our checks. Here are some of them:

  • Cucumber Tags (-t)
    Using Cucumber tags is an easy way of defining groups of tests in a feature file, so we can choose to only run a select group instead of running everything when we test a particular feature. Here is an example of a feature file (with sample filename of policies.feature) with tags (displayed in bold, characterized by the @ symbol):

      Feature: Booking Engine Rate Plan Policy Copies

       @prepay @partial
       Scenario: ShowRooms Prepayment Policy, DWH Partial
         When guest views the policies for a DWH property for a partial rate plan
         Then a copy of 'Only 10% prepayment is required to confirm your reservation' is displayed in the prepayment policy

       @prepay @full
       Scenario: ShowRooms Prepayment Policy, DWH Full Non-Refundable
         When guest views the policies for a DWH property for a full nonrefundable rate plan
         Then a copy of 'Full prepayment is required to confirm your reservation' is displayed in the prepayment policy

       @reservation
       Scenario: ShowRooms Reservation Policies, DWH Partial, Lead Time Early Modification
         When guest views the policies for a DWH property from 4 DAYS FROM NOW to 6 DAYS FROM NOW for a Public_Partial_LT rate plan
         Then a copy of 'We don't charge you a modification fee if you choose to modify before' is displayed in the modification policy

     
    If we want to run the prepayment policy copy tests (the first and second scenarios in the example), we can run those checks as:

      cucumber policies.feature -t @prepay

    And if we want to run only the single reservation policy copy check in the example feature, we can run that as:

      cucumber policies.feature -t @reservation

    More information about how to use cucumber tag are found in the Cucumber tags Wiki page.

  • Custom Environment Variables
    We can create custom variables we can use for specifying how we want our tests to run. For example, we might like to run the same feature test for a different browser, or on a mobile application instead of on a desktop web app.

    To define what custom variable we want to use for our checks (say, a browser type), we could write the following code in the env.rb file:

      def browser_type
        (ENV['BROWSER'] ||= 'chrome')
      end


    which means that we are stating a browser type variable of name ‘BROWSER’ we can use for describing which browser we would like to use during the test run.

    If we want to run the policies feature check on a firefox browser (assuming that functionality is built in our test code), we could say that as:

      cucumber policies.feature BROWSER=firefox

    And if we want to run the same checks on a chrome browser, we can either say that the browser type variable should equal to ‘chrome’:

      cucumber policies.feature BROWSER=chrome

    or just omit the browser type variable altogether, since the browser defaults to the value of ‘chrome’ based on the code above:

      cucumber policies.feature

  • Cucumber Profiles (-p)
    Eventually there will be a situation where we would need to use common cucumber commands, tags, or custom environment variables in running our checks, and typing all of those may prove tiring and unproductive. For example, would you feel good typing in

      cucumber policies.feature FIG_NEWTON_FILE=staging.yml --no-source --color --format pretty -t ~@not_ready BROWSER=firefox

    to run the policy copy checks (not including the checks that are not yet ready) for the firefox browser in the staging test environment with test results display in the terminal displayed with color and formatted properly? I personally wouldn’t enjoy writing all of that, and this is where cucumber profiles help. To use profiles, we could state desired profiles in the cucumber.yml file, like so:

      default: FIG_NEWTON_FILE=staging.yml --no-source --color --format pretty --tags ~@not_ready
      dev: FIG_NEWTON_FILE=dev.yml --no-source --color --format pretty --tags ~@not_ready
      uat: FIG_NEWTON_FILE=uat.yml --no-source --color --format pretty --tags ~@not_ready
      parallel: FIG_NEWTON_FILE=staging.yml --no-source --color --format pretty --tags ~@not_ready --format html --out reports/parallel_.html

    where in the example above we can see that there are four profiles, namely: default, dev, uat, and parallel.

    When we want to run the same checks as before in the uat test environment, we would only need to type in the following:

      cucumber policies.feature -p uat BROWSER=firefox

    And when we want to run the same checks in staging (where we would usually run them), we can even omit writing the profile since the default profile runs whenever the profile is not defined:

      cucumber policies.feature BROWSER=firefox

    More information about how to use cucumber profiles are found in the Cucumber cucumber.yml Wiki page.

About failing Automated Watir checks on Firefox v.48 and successfully running them on Google Chrome v.52

The recent updates on the Mozilla Firefox browser starting from version 46 onwards broke my automated end-to-end checks. The browser loads when started but does not go to a test page or do anything until it eventually fails, because the latest versions of Firefox supposedly doesn’t use the FirefoxDriver anymore for automation and instead makes use of a new driver implementation in what is called Marionette. In order to get my checks running again in Firefox, I had to resort (as what many others in the community also did) to using the Extended Support Release version of Firefox v. 45, a temporary measure until I finally get my Cucumber-Watir checks running properly on the latest Firefox version.

At the moment I am stumped by an error when running automated checks on Firefox v. 48.0.1 using Marionette (which seems to be a problem on permissions on my local Windows machine, and not on watir or selenium, although port 4444 points to the port which selenium grid is connected to):

Permission denied - bind(2) for "::1" port 4444 (Errno::EACCES)
C:/Ruby/lib/ruby/gems/2.2.0/gems/selenium-webdriver-2.53.4/lib/selenium/webdriver/firefox/service.rb:103:in `stop_process': undefined method `poll_for_exit' for nil:NilClass (NoMethodError)
from C:/Ruby/lib/ruby/gems/2.2.0/gems/selenium-webdriver-2.53.4/lib/selenium/webdriver/firefox/service.rb:83:in `stop'
from C:/Ruby/lib/ruby/gems/2.2.0/gems/selenium-webdriver-2.53.4/lib/selenium/webdriver/firefox/service.rb:64:in `block in start'
from C:/Ruby/lib/ruby/gems/2.2.0/gems/selenium-webdriver-2.53.4/lib/selenium/webdriver/common/platform.rb:161:in `block in exit_hook'

So, while I’m trying to sort out that problem (anybody experienced this?), I decided to move my checks to run on the latest version of Google Chrome by default instead of running them on an old version of Firefox. To do that, I needed to update my browser capabilities:

if browser_type == :chrome
    arguments = "--ignore-certificate-errors" // Add more desired arguments
    capabilities = Selenium::WebDriver::Remote::Capabilities.chrome "chromeOptions" => {"args" => [ arguments ]}
elsif browser_type == :firefox
    capabilities = Selenium::WebDriver::Remote::Capabilities.firefox
end
browser = Watir::Browser.new :remote, :url => url, :desired_capabilities => capabilities

And all that is left is to see how the checks behave on Google Chrome.

Some findings:

  • Button or link elements in the browser (especially when they are only span or heading elements that are being used functionally as buttons) that are not immediately visible in the Chrome viewport fail to be clicked properly. To fix this, focus on the element first (or alternatively call a scroll method in the browser using javascript to a position where the element becomes visible in the viewport) before running the click step.
  • Some wait methods that didn’t necessarily have to be written (when checks were run in Firefox) need to be explicitly stated when running checks on Chrome.

A Basic Guide to Creating XML API Automated Checks

Checking out the Agoda YCS5 API

API testing is interesting. They’re very different from functional user interface testing because they do not require any UI, although programmers can provide testers some user interface for checking them if needed. They’re actually pretty straightforward to perform, they’re relatively easy to code, and they also provide fast feedback, unlike UI tests which often breaks easily, complicated to code, and are generally slow. I’ve been focusing on writing automated API checks for some apps in recent weeks and found out that the process was simple.

And here’s a basic guide of what that process looks like, in three steps:

  • Build the request content
    A basic XML request document source looks like this:

    <?xml version="1.0"?>
    <request>
       <element attribute="value">
       possibly a chain of more elements will show here
       </element>
    </request>

    In creating checks, this request source is just treated as a String data type, and then converted later to XML if necessary. I usually strip the source into three parts, namely header, footer, and body, and then just combine the parts. Usually it’s just the body part of the request that changes for scenario checks. How the actual request looks like, of course, is often found in the documentation of the API that you desire to test.

    For our example:

    header = <request>
    body = <element attribute="value"></element>
    footer = </request>

    The body can be further stripped down into many parts if desired, as it happens that some requests can contain multiple elements and sub-elements.

    In building a request, I just create a method that I can call anytime:

    def build_request(request_type)
       return get_header(request_type) + get_body(request_type) + get_footer(request_type)
    end

  • Send the request to the API endpoint, and retrieve the response
  • In API testing, what we check is the response of the API when we send a particular type of request to it. And to be able to generate a valid response from the API, we need to send our request to a valid endpoint. Sometimes that endpoint needs access credentials, sometimes it is the request themselves which contain said credentials. These details are often requested from the people who manage the API, or are sometimes found in your account information if the API requires you to create an account.

    As for how automation can send a request and generate a response, I often use the rest-client gem this way inside a method:

    def get_response(endpoint, request)
       begin
         response = RestClient.post endpoint, request, {:content_type => :xml}
       rescue => e
         response = e.response
       end
       return response
    end

  • Validate the API response
  • Checks are of course not complete if there are no actual comparison between actual and expected results. This defines whether the check passes or fails, and by default any check will pass if there are no conditions about response failure (except for failure of the test to reach the API endpoint).

    For the example request, this might be one of the ways I want to validate the API response using the nokogiri and rspec gems (assuming that a successful response contains a result element with a count attribute of value 1 inside it):

    def validate_response(response)
       expect(response.xpath(//result).attr('count').to_s).to eq('1'), "Result count should be 1"
    end

    In the end, the implementation of how to properly validate responses vary. There are scenarios where tests need to check for error elements in the response, and there are some tests where data in the response also needs to be verified.

Steps In Starting A Cucumber-Watir-Ruby ATDD Automation Project using TestGen (Windows)

I said that I was going to lay low on automation this year. However, I was also still curious about implementing a Watir-Ruby counterpart of my existing Java-Webdriver automation framework, including an acceptance-test driven development (ATDD) or a behavior-driven development (BDD) functionality built-in, just so I can understand how different the two frameworks are, based on my own experience. Long story short, I learned how to do it, with help from Jeff Morgan’s “Cucumber & Cheese” ebook, and was surprised how easy it was to start, and eventually write code.

If you ever want to try building a Cucumber-Watir-Ruby project from scratch on a Windows machine, try this:

  1. Download the latest version of Ruby for your machine
  2. Run the installer, ticking the following options when prompted
    • Install Tcl/Tk support
    • Add Ruby executables to your PATH
    • Associate .rb and .rbw files with this Ruby installation
      CucumberWatirRuby_setup_1_rubyinstall
  3. Run the command prompt, a shortcut is by pressing the Window and R keyboard buttons at the same time, typing in cmd, and then pressing Enter
    CucumberWatirRuby_setup_2_cmd
  4. Test the Ruby installation by running ruby -v
    CucumberWatirRuby_setup_3_rubyversion
  5. Close the command prompt if the Ruby version is displayed in the screen. If not, try re-installing Ruby or checking if Ruby is set in your machine’s Path under system environment variables
  6. Download the Ruby Development Kit for your version of Ruby
  7. Create a new folder under C:\ directory called devkit
  8. Extract the Development Kit files to the newly created directory
    CucumberWatirRuby_setup_4_devkit
  9. Run the command prompt again
  10. In the command prompt, navigate to the devkit directory by running cd C:\devkit
  11. Once inside the directory, type in ruby dk.rb init and then press Enter
  12. After that, type in ruby dk.rb install and press Enter
    CucumberWatirRuby_setup_5_devkitinstall
  13. Then let’s install some gems by running this: gem install cucumber testgen rake bundler yard watir-webdriver page-object fig_newton
    CucumberWatirRuby_setup_6_gems
  14. When the gems finish installing, go back to the command prompt and run cd C:\Users\Your_Machine_Name or go to a desired directory where you want to house your automation project
  15. Still in the command prompt, run testgen project Project_Name –pageobject-driver=watir. This should create a new directory structure inside your project folder which cucumber will use to run your automated checks.
    CucumberWatirRuby_setup_7_testgen
  16. Create a test_filename.feature file (without anything in it) inside your project directory
  17. Test if the project works by going to the project directory and then running cucumber test_filename.feature in the command prompt
    CucumberWatirRuby_setup_8_cucumber

If you encounter problems with a ffi_c file, such as a “cannot load such file — ffi_c (LoadError)” error, doing the following may help:

  1. Run gem uninstall ffi
  2. Then run gem install ffi –platform ruby

If the ffi_c issues persists, uninstalling the latest version of Ruby, installing an older Ruby version (say v2.1.8) and redoing Steps 3-17 may fix the problem.

Note: For a Mac or an Ubuntu machine, the Ruby and Devkit installations may differ.